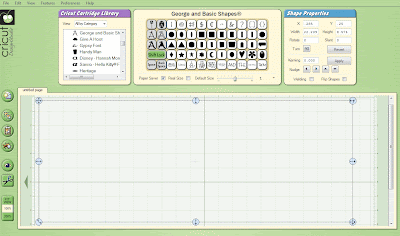
First you need to have Design Studio installed on your computer. If you do not have the Design Studio; you can download the FREE TRIAL here: http://www.cricut.com/CDS/DesignStudioTrial1.aspx
You will also need to have a screen capture software on your computer. I use Screen Hunter. You can download it for free here: http://wisdom-soft.com/products/screenhunter_free.htm
Now...to the fun part. Open up the Design Studio and start designing.
The First thing you want to do is create a rectangle (for blog header) or square base (for a blog button). For a header you are going to want to be working on a 12x24 mat. To change the mat size go to the top of the screen and click on VIEW ~ MAT SIZE ~ 24X12
To create an image that is going to fill the header space on your blog you will want to make the rectangle as large as you can fit in the screen. It has to all be visible without scrolling in order to create a screenshot of the image.
Now place your mouse pointer on the cutting mat and right click. A window will open and you will find the option to set preview color. This is going the be the background of your image so choose a color accordingly. You can also add a title to this page to help you keep track of where everything is.
Now you need to open a new page (click on the top image on the left side of the screen with what looks like a piece of paper and a star on it). Add another image to this page. And title your page and choose the color of the image. You will need to change the page order as you go to ensure the correct images show in the correct order. To do this right click on your cutting mat and select page order. Then select where you need this page to be.Continue creating pages (a different page for each color that you are using. Do not overlap images. If they need to overlap; you need to create a new page/layer.)
Now...click on the preview button (the little eye on the left) and you will see the image. Click on the differnt page layers to get a little different image until you find the one you like. Now adjust as you see fit.
When you are happy with your image you will need to capture it. Open up your Screen Hunter (or screen capture software). Go to the Cricut Design Studio page and click on the eye to preview your image. Use the F6 button on your keyboard to open up the Screen Hunter cursor. Use your mouse to put the cursor (red box) to the top left corner of the image you want to capture. (Stay to the inside of your background color so that you don't catch any of the cutting mat in your image). Click and hold the left mouse button down and drag the capture window to the right to include your entire image. When you release the left mouse button it will click and it will have captured the image (mine goes right to my desktop). If you like the image go put it on your blog.
-------------------
To add to your blog in blogger:
1. Open your blog and click on the Design tab at the top of the screen.
2. Click on edit in your header (the first dotted box)
3. Find the image on your computer and add it.
4. Hit save and enjoy your header!!!!
If you create one come back here and post a link to your blog....I would love to see what you create!!!!
I JUST THREW THIS TUTORIAL TOGETHER QUICK...SO IF YOU HAVE ANY QUESTIONS PLEASE FEEL FREE TO ASK AND I WILL UPDATE THE TUTORIAL IF NEEDED!!!!!!


1 comments:
'great idea!
Post a Comment