
Wednesday, February 12, 2014
New blog home - come visit me!
Thank you to all of you who have visited me here at Snug as a bug. I have recently made a new home for my blog. I would love for you to stop by and visit!
http://creativecarnivalcreations.blogspot.com/
Saturday, March 3, 2012


Wednesday, January 18, 2012
Busy, Busy, Busy!!!!
Well....I have not been so good at squeezing in my crafty time but I have been busy! I have decided to open up an in-home family child care and have been working on plans and paperwork for that....which takes up much of my free time right now. But I did manage to squeeze a little scrappy time in for myself and I have created these cards. I think I need to go back to scrapbooking because the card thing....well....I am just not feeling it right now. I do have to make up some samples for my sister in law as she is getting married and I am making her invites.......I need the mojo to get going on that project! LOL
Here is what I have created in the past week or so:
The stamps are all Unity!
The paper I am not sure off most of it....I have been on a crafty spending freeze so I am using up my stash of paper which is just not appealing to me right now....but I must use some of it up before I can allow myself to buy more! LOL
I used the sketch from over at Card Patterns for this card:


The sketch over at Card Positioning Systems inspired this card:

Now off to a few projects I need to complete for a friend and some vinyl projects I need to complete for my children (they have been asking for awhile).
Thanks for stopping by! Don't be shy...take a moment to leave a comment and say Hi! Who doesn't love making happy crafty friends? :)
Hugs,
Sara
Thursday, January 5, 2012
A little challenge love!
I am so excited to be back in the challenge scene. I love a good scrappy challenge!
This card is for both the Unity Stamp company facebook challenge (use an itty bitty) and also for the Mojo Monday sketch challenge.
I used the Calendar itty bitty from Unity Stamp company along with the sentiment stamp from the February 2011 Unity kit of them month club. I love how simple this card is but yet looks fabulous.
I started with a piece of Kraft cardstock and stamped the calendar image directly onto the card.
I then went around the card with some distress ink (Walnut Stain and Festive Berries).
A little touch of Washi tape (love that stuff!).
Then I threw together a couple of flowers and this fun brad. (I took some walnut stain distress ink after the metal brad to give it a little bit of a worn look to it. It was such a bright shining silver that just didn't go well with the feel of the card.....a little distress ink did the trick ;) ).
With a couple of pop dots; I added a few pins behind the flower and attached to card.
Throw on a few gems for that extra touch of bling.
Stamp the sentiment and voila!


Thanks for visiting and don't be shy! Before you leave please take a moment to say hi! ;)
Hugs,
Sara
Monday, January 2, 2012
Peachy Keen Stamps Let's Face it Friday challenge
Hello! Today I have a card for you that I threw together (actually two cards). I was visiting the Peachy Keen Stamps blog and saw their new challenge and the color scheme was perfect for this cute patterned paper I have been sitting on. It is a pretty simple card....but sometimes that is better that way.
I used Create-a-Critter Cricut Cartridge for the cute little sea creatures and the Critter Faces Peachy Keen Stamps set for the faces.
The happy birthday sentiment is from Stampin' UP!


Thanks for visiting! Don't forget to take a minute and leave to comment to let me know you stopped by! :)
Hugs,
Sara
Saturday, December 31, 2011
On a roll!
Woot woot.....I am on a roll so far...2 for 2!
This layout is another idea from the Magic book by Jeanette Lynton. Don't be intimidated by the amazing pages displayed in this book......most of them are so much easier to create than they actually appear at first glance.
I love how these photos turned out. my 4 year old (at the time - she is 5 now) was suppose to be in the wedding but chickened out at he last minute and my 8 year old (now 9 year old) was happy to take her place....good thing the dress fit both of them! ;)


 The "magic" in this page is in the following images. I created a flip book with two hinges to nicely fit all of the great photos I wanted to add to the layout. I created the flip book by taking two pieces of cardstock (4 1/4" x 6 1/4") and matted three of the photos with them. (One piece of cardstock has a photo and front and back and the other just has one on the back). I then attached the two pieces of cardstock with a couple of hinges and brads. Then I attached the backside (without a photo) to the base page. The page protector will need to be cut to allow the pages to be turned in the album. (HINT: If you do not have hinges you could also cut a piece of cardstock at 8 1/2" x 6 1/4" and score to create a mini book.)


Thanks for stopping by to visit my blog. I hope to have a new layout to share with you tomorrow. HAPPY NEW YEAR!!!!!
This layout is another idea from the Magic book by Jeanette Lynton. Don't be intimidated by the amazing pages displayed in this book......most of them are so much easier to create than they actually appear at first glance.
I love how these photos turned out. my 4 year old (at the time - she is 5 now) was suppose to be in the wedding but chickened out at he last minute and my 8 year old (now 9 year old) was happy to take her place....good thing the dress fit both of them! ;)


Thanks for stopping by to visit my blog. I hope to have a new layout to share with you tomorrow. HAPPY NEW YEAR!!!!!
Friday, December 30, 2011
Back into the swing of it! Button Slide (Magic page)
I am so happy to be back into the scrappy swing of things! It has been so long since I worked on any of my own personal projects. Here is a layout I just finished about my daughters first year at Camp Rosholt. It is a camp for children with Diabetes and she just loved it. It was great for her to have a whole week where everyone dealt with the same things she deals with everyday. Seeing that she is not alone and really not that different. She learned a lot and had a great time - she can't wait to go back again this coming summer.
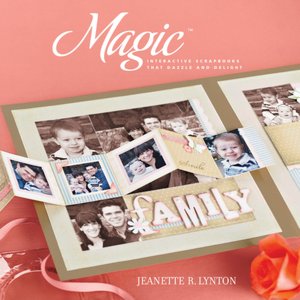 I picked up a super fun book this summer called Magic interactive scrapbooks by Jeanette Lynton and it has so many fun interactive techniques I can't wait to try. This is one of them. It is called the button slide. It really was very easy!
Here is the layout I created:

You can see the button slide in the two following images. To create there are just a few simple steps to create a really fun interactive page.
1. Create your page as you normally would.
2. Cut around 3 sides of your stationary photo that you will be sliding your hidden photo over.
3. Create your hidden photo by backing it with cardstock that is 1/2" taller and 1/4" wider than your photo. Keep the left edges flush but center the top and bottom edges.
4. Sew a button on the left edge of the matted photo. (Tip: Sew the button as close to the edge as you can. I stitched mine a little bit too far to the right and now the photo doesn't quite hide like I would like it to).
5. Create a track on the backside of the layout using foam tape. Be sure to extend the tape the full length of both photos and not any longer and also make sure it is flush with your sliding photo.
6. Place your hidden photo under the stationary photo.
7. Cut a backing out of cardstock that is twice the width and 1 1/2" taller than the stationary photo. Apply adhesive to the back of the stationary photo along the 3 cut edges. Attach the backing to the stationary photo and the track you created with the foam tape.
8. Then you cut a slit in your page protector for the button to slide.
(I think I will do a tutorial for the next magic layout!)


Thanks for visiting and I hope you come back again soon! I can't wait to create my next page!!!!!
Subscribe to:
Posts (Atom)
My creations are protected!

